Haman's fingers
You may know that Queen Esther is the heroine of the joyful holiday of Purim, which begins Wednesday evening. She was the beautiful Jewish woman selected by the King of Persia to be his wife. After she became queen, she begged the king to save her people from Haman’s wicked plan to destroy them. He did, and thus the Jews were saved.
But did you know that Esther might have been a vegan?
When the rabbi at Hebrew school taught our class that Queen Esther was said to have lived on seeds and nuts because she could not get kosher food at the king’s palace, I couldn’t imagine anyone eating like that. In our home, seeds appeared as the poppy seeds on challah and the caraway seeds in rye bread, and the most familiar nuts were the bits of walnuts that my mother sometimes added to brownies.
Yet seeds and nuts have countless uses beyond their most familiar roles as snacks and garnishes. They are made into a variety of sauces and dips, like Middle Eastern tahini, or sesame sauce, the Persian walnut pomegranate sauce called fesenjan and Mexican pipian sauce made from pumpkin seeds.
Some say Queen Esther’s diet also included legumes, the “seeds” of bean pods. Today we would call Queen Esther a vegan, the term for vegetarians who avoid all animal products, including dairy foods and eggs.
As a tribute to Queen Esther’s diet, many cooks make a point of including seeds and nuts in their meals for the holiday. For a memorable Purim celebration, why not prepare a wholly vegan menu?
You might start with noodles with poppy seeds, Purim’s signature ingredient. In some families of Ashkenazi origin, the seeds are popular as a topping for buttered noodles. On a vegan menu, poppy seeds, paired with roasted pepitas, provide a bit of crunch and a subtle nutty flavor to noodles dressed with slightly sweet caramelized onions and cabbage.
Some say Queen Esther’s diet also included legumes, the “seeds” of bean pods, and adding garbanzo beans to the Purim meal is another way that Esther’s diet is honored in many Jewish households. The freshly cooked beans, served hot with a drizzle of olive oil and a sprinkling of salt and pepper, make a tasty appetizer.
For a vegan Purim menu, serve garbanzo beans as part of a vegetable and sesame feast. Modeled on a Provencal specialty called le grand aioli, composed of fish and cooked vegetables served with garlic mayonnaise, our Middle Eastern twist has garbanzo beans to stand in for the fish and pale green herb-and-garlic-flavored tahini sauce instead of the egg-yolk-based aioli.
A colorful assortment of cooked vegetables, including carrots, broccoli and Korean radishes, served alongside roasted eggplant and shiitake mushrooms, rounds out the tempting platter; you can add baby potatoes, cauliflower, green beans or whatever is freshest at your market. Toasted sesame seeds sprinkled over the vegetables are a tasty reminder of Queen Esther’s seed-based diet.
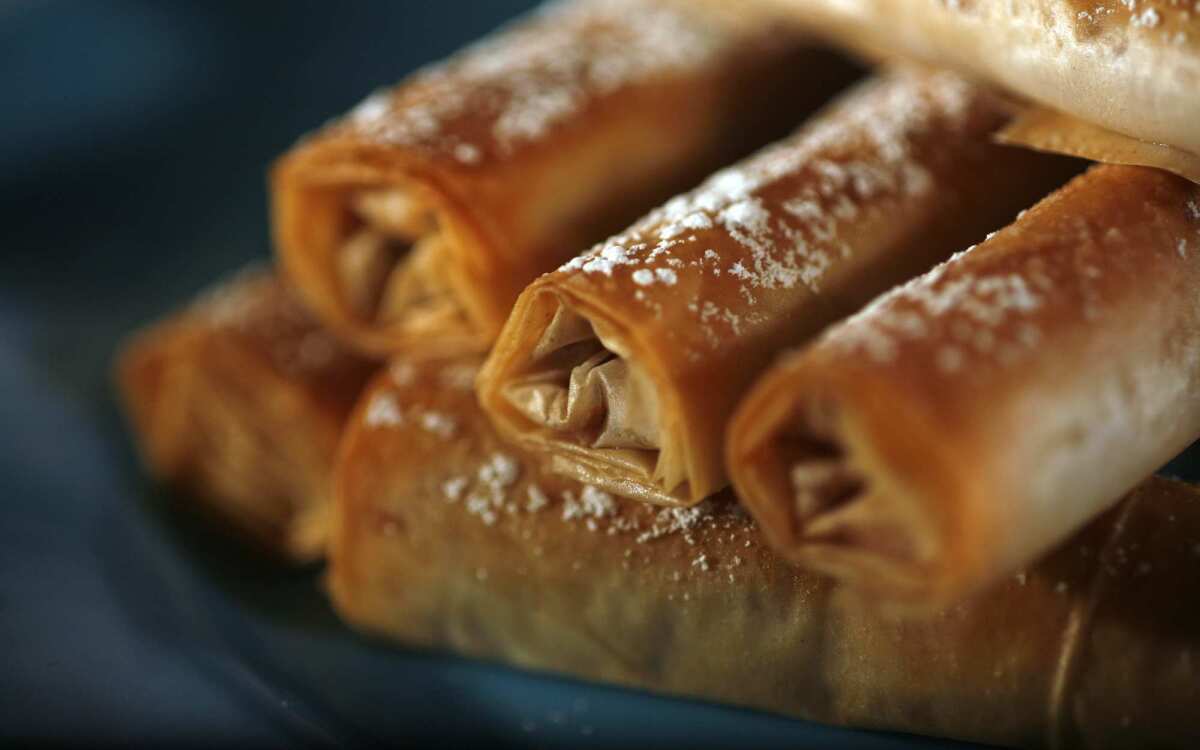
In addition to hamantaschen -- the ear-shaped cookies -- which are of Ashkenazi origin, some like to serve Sephardi nut and filo pastries such as Haman’s fingers. Unlike many filo dessert pastries, these simple sweets need no syrup. Although they don’t have much sugar and are brushed only lightly with oil, their cinnamon-scented filling of walnuts, almonds and pine nuts makes them absolutely delicious.
Levy is the author of “1,000 Jewish Recipes,” “Feast From the Mideast” and “Healthy Cooking for the Jewish Home.”
Place the almonds in a food processor. (If using extra almonds instead of the pine nuts, add these to the processor; if using pine nuts, do not add them as they should be left whole.) Pulse the processor to chop the nuts; do not grind the nuts to a powder, there should be some small pieces left. Place the chopped nuts in a medium bowl, then pulse the walnuts in the same way. Add the chopped walnuts to the bowl with the almonds.
Add the pine nuts, cinnamon and 3 tablespoons plus 1½ teaspoons powdered sugar to the bowl, stirring to mix thoroughly.
Lightly oil 2 baking sheets, or line them with parchment paper or foil and lightly oil the paper.
Remove the filo sheets from the package and unroll them onto a sheet of plastic wrap. Cover the remaining stack immediately with plastic wrap, then with a slightly damp towel. (Return filo sheets you won’t use to their plastic sleeve, re-roll and return to the package; refrigerate or freeze for other uses.)
Transfer the stack of filo to a completely dry cutting board. With a sharp knife, cut the stack of filo into rectangles about 8½ inches in length and 6 inches wide (Sheet size will vary by brand; filo sheets measuring 17 inches by 12 inches should be quartered to form smaller rectangles, sheets measuring 12 inches by 9 inches should be halved.)
Remove a pastry piece from the stack to a work surface. Brush the piece lightly with oil, beginning with the edges; avoid getting oil on the work surface, as it would make the dough stick. Work with only one sheet at a time, keeping the remaining sheets covered so they don’t dry out.
Spoon about 2 teaspoons filling along the short end of a filo piece so that the filling extends along the short edge, leaving about three-fourths inch free of filling on each side. Roll the filling into the filo as you would a very thin burrito: Fold the two longer sides of the dough rectangle inward, covering the filling by about 3/4 to 1 inch on each side. Dab the folded dough lightly with oil. Roll the pastry tightly to form a thin finger. Set the pastry seam-side down on a prepared baking sheet. Brush the pastry finger lightly with oil.
Make more filo fingers with the remaining dough and filling. Wipe the work surface with a paper towel once in a while so it does not become oily. You can shape the pastries 1 day ahead and refrigerate them, tightly covered with plastic wrap, on baking sheets or on plates; or you can freeze them, tightly covered, up to 1 month.
Heat the oven to 350 degrees. Bake the pastries until golden, about 8 to 10 minutes. Cool them on a rack.
Just before serving, shake or sift powdered sugar generously over the pastries.
Get our Cooking newsletter.
Your roundup of inspiring recipes and kitchen tricks.
You may occasionally receive promotional content from the Los Angeles Times.

