Hand pies with mustard greens and Spanish chorizo
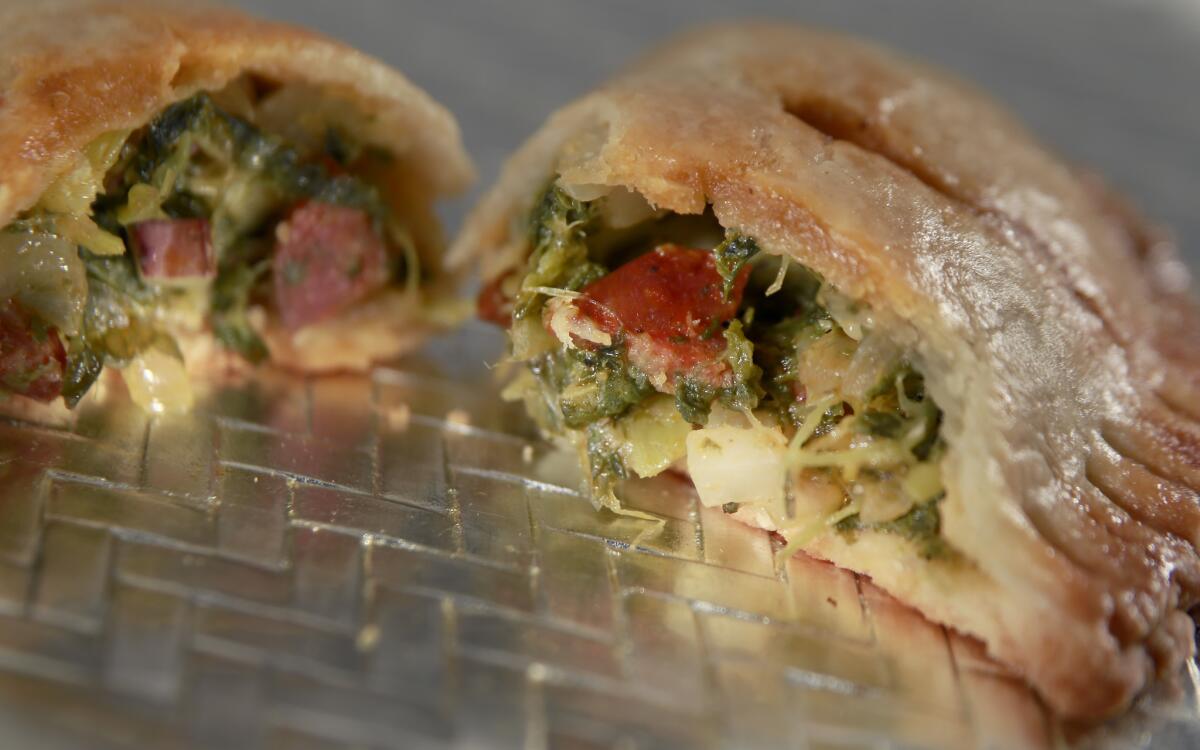
Here in Southern California, it’s funny to think of winter greens as even having a season. Stroll the produce aisle of your local supermarket pretty much year-round, and you can find vibrant bunches of rainbow chard or frilly escarole, the broad waxy leaves of pale green collards or delicate beet tops, their colorful stems a flamboyant extension of the roots.
But winter months are when local vegetables thrive and are at their peak, with sweeter leaves and superior flavor nurtured by colder weather. You can see the differences between year-round imports and seasonal greens best, of course, at local farmers markets. Right now, look for cabbages such as kale, members of the chicory family such as endive and escarole, as well as spinach, chard, beet and turnip greens, mustard and collard greens, and broccoli greens.
All too often, winter greens get a bad rap. They’re considered overly assertive and aggressive. The word “bitter” gets thrown around a lot. But treated properly, the greens can add a wonderful, even lively, dimension to a recipe. Which is why they’re so common in so many cuisines, such as the New Year’s staple of slow-cooked greens and black-eyed peas in the South, Chinese mustard greens quickly stir-fried with a touch of garlic and hot pepper, or slow-braised German cabbage. Consider winter greens as you might a relationship: Get to know them, treat them right and the rewards will be long-lasting.
Incorporate winter greens raw or cooked, depending on the variety and your tastes. Use small, tender leaves as a raw garnish or salad base. If the leaves are larger, or even the slightest bit tough, as with kale, massage them with a little vinaigrette or oil and salt; the rubbing tenderizes the leaves, as with cooking, and mutes their dominant notes. And if you’ve grown weary of kale lately, just think beyond smoothies and kale chips — the stuff is incredibly versatile.
Many winter greens adapt particularly well to grilling or charring. Halve or quarter a head of endive or escarole and throw it on the grill; the direct heat quickly caramelizes the leaves to bring out the vegetables’ sweetness. Some greens, such as chard or spigarello — a relative of the broccoli family often found in Italian cooking — can be quickly wilted or sautéed, or even added at the last minute to a soup or stew, lending bright color and only mildly aggressive flavor. Other varieties, such as mustards and older or larger-leafed vegetables, benefit from low and slow cooking, their peppery notes and tougher textures yielding with time.
You’ll find that many recipes call for separating the leaves from their thick stems before cooking. Fibrous stems break down more slowly than the more delicate leaves, which is why many preparations involve cooking the stems first, then adding the greens toward the end of the recipe.
Even the toughest winter greens require delicate care, and you’ll want to use them within a day or so after bringing them home. Look for leaves that are crisp and vibrant and store the greens, unwashed and refrigerated in a plastic bag before using. Wash the greens well right before preparing, to get rid of any dirt or pests in the nooks and crannies.
The next time you bring home a bunch of colorful beets or turnip roots, save the tops. Consider cooking them or adding them to a salad — or more — for flavor and nutrients. And with the current focus on combating food waste, you might even feel virtuous — deservedly so.
noelle.carter@latimes.com
Make the dough: In a large bowl, whisk together the flour, salt and sugar. Add the shortening and incorporate using a pastry cutter or fork (the dough will look like moist sand). Cut in the butter just until it is reduced to pea-sized pieces. Sprinkle the vinegar and 8 tablespoons water over the mixture, and stir together until the ingredients are combined to form a dough. Remove the dough to a lightly floured surface and knead a few times until it comes together in a single mass. If the dough is too crumbly and dry, gently work in additional water, 1 tablespoon at a time. Mold the dough into a disk roughly 8 inches in diameter. Cover the disk tightly with plastic wrap and refrigerate at least 2 hours, preferably overnight.
Bring a large pot of salted water to a boil. Add the greens to the water and boil until they’re tender, 12 to 15 minutes. Drain the greens, then shock in a bowl of ice water to stop the cooking process. Drain again and run through a salad spinner to remove any excess water. Chop the greens coarsely and set aside.
Heat a large saute pan over medium-high heat until hot. Add 2 tablespoons olive oil, then the onion, and cook, stirring frequently, until the onion is softened and translucent, 6 to 8 minutes. Stir in the garlic and cook until aromatic, about 1 minute. Stir in the chorizo and cook until it is lightly browned, about 3 minutes. Add the white wine and simmer, stirring to scrape any flavoring from the bottom of the pan, until the wine is almost completely evaporated or absorbed. Remove from heat and spoon the filling into a bowl.
In the same pan, heat the remaining 2 tablespoons olive oil over medium-high heat. Add the potato and cook, stirring frequently, until it just begins to brown. Stir in 1/2 cup broth. Cover the pan and steam the potato until the pieces are crisp-tender, about 5 minutes, stirring occasionally. Stir in the greens and remaining broth and cook, stirring frequently, until the broth and any liquid from the greens are almost completely absorbed, 2 to 4 minutes. Remove from heat. Stir the potatoes and greens in with the chorizo mixture. Stir in the cheese. Cover the bowl and refrigerate the filling until it is chilled, about 1 hour.
Divide the prepared pie dough into 12 even pieces, about 3 ounces each, and shape each into a small disk. On a lightly floured board, carefully roll each piece into a circle about 6 inches in diameter and about one-eighth-inch thick. The dough will be flaky and will probably crack on the edges; without working the dough too much, gently mold the dough with your hands as it’s rolled to form as perfect a circle as possible. Carefully set the circle aside and continue rolling until all of the circles are formed.
Assemble the hand pies: Brush the inside of each circle with a very light coating of beaten egg, brushing all the way to the edge of the circle. Place roughly one-fourth cup of the filling in the center of each circle, slightly off to one side (to make it easier to fold over the dough to form the hand pie), but leaving a 1-inch border around the edge on one side. Carefully — this can be tricky — fold over half of the dough, lining up the edges to form a half-circle; you may need to support the dough as it’s folded over to keep it from cracking. Gently press down the edges to seal the pie. Trim the edges to clean them up, or gently brush the top of the edge of each pie, then fold the edge in again for a cleaner-looking side. Continue until all of the pies are formed.
Place the prepared pies on a parchment-lined baking sheet and refrigerate them, uncovered, for 30 minutes. Meanwhile, heat the oven to 400 degrees.
Remove the chilled pies and brush them with the egg wash. Use a small knife to slash 2 to 3 small steam vents in the top of each pie.
Bake the pies on the center rack until the pastry is puffed and golden brown, about 30 minutes. Rotate the pies halfway through baking for even coloring. Cool on a rack. The pies can be served warm or at room temperature.
Get our Cooking newsletter.
Your roundup of inspiring recipes and kitchen tricks.
You may occasionally receive promotional content from the Los Angeles Times.


