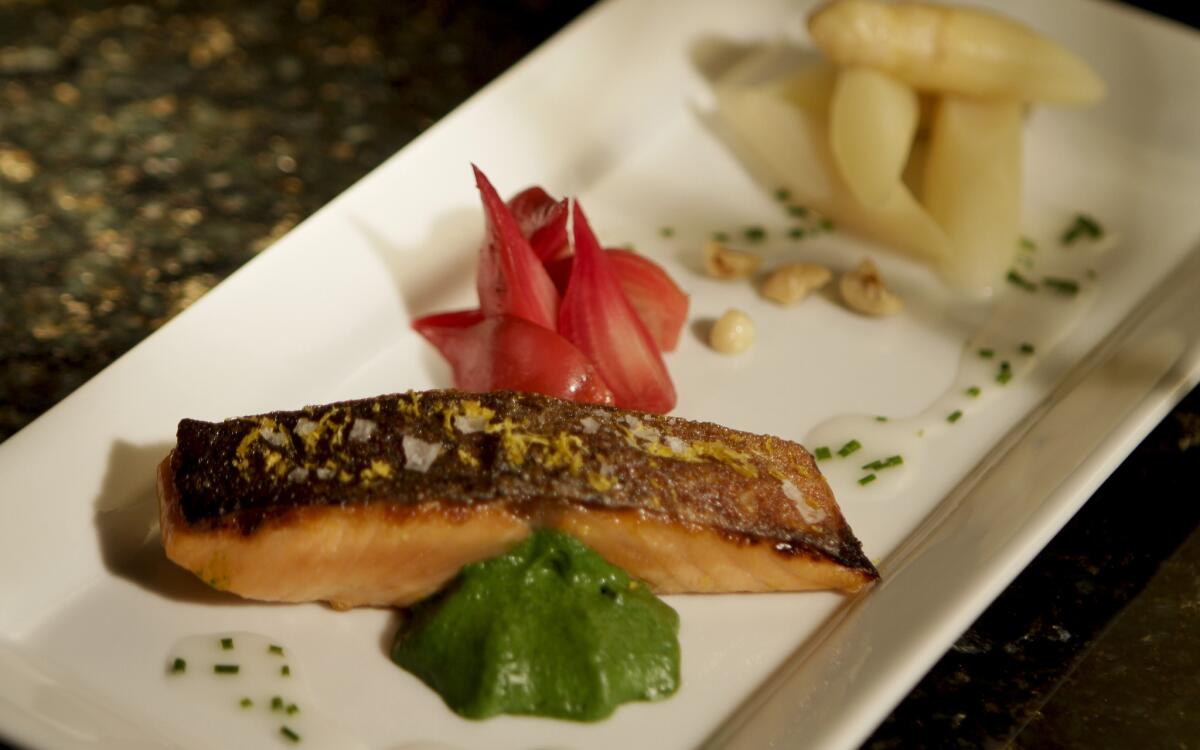
Meyer lemon-cured salmon with spring vegetables
There is no shortage of culinary advice floating around today -- in books, on television and on the Internet -- but I think there’s good reason to be a bit skeptical of kitchen tips no matter their source. When you cook at home you answer to no one but yourself. Just because I choose to take one approach in my cooking doesn’t mean it will necessarily work for you, but I’d like to think that there are a few recipes and techniques that can improve the food you prepare at home.
“Season with salt and pepper” is a common way to end a recipe (it’s even something that I’ve written in my books), but as culinary advice it’s a bit misleading. In the kitchen it’s helpful to separate the concept of “seasoning” from that of “enhancing flavor.” One is a way to add flavor to a dish, and the other is a way to intensify flavors without changing them, though we typically use the verb “season” to describe both processes. A true seasoning ingredient can be anything that brings a new flavor to what you’re preparing; pepper, piment d’espelette and mustard are just a few seasonings that I like to use.
When you use salt to intensify flavor, though, it should be barely perceptible. Nevertheless it will have a profound impact on the flavor of the dish as a whole (it should taste better, but it shouldn’t taste salty). In our kitchens, we do this by adding salt early in the preparation through the use of different types of brining: wet and dry.
In a wet brine, salt and other flavorings are dissolved in water and a piece of meat, such as a whole chicken, is submerged in the brine. Most animals are largely made up of water, so by submerging them in a brining liquid, we allow an equilibrium to develop between the salt in the brine and the salt in their natural juices. It gives us the ability to evenly distribute salt throughout the meat or fish at a level that enhances the flavor rather than overwhelming it. When you’re working with a wet brine, salt and acid naturally work hand-in-hand to enhance flavor, a technique best exemplified by our poulet roti at Bouchon Bistro.
Meyer lemon-cured salmon works somewhat differently, because there’s no moisture involved. This is a dry brine, which is exactly what it sounds like: a mixture of flavor enhancers -- typically based in a blend of salt and sugar -- as well as other flavoring agents that are not dissolved in a liquid but rather applied directly to the meat.
Dry brining has essentially the same mechanics as dry curing, it’s just that our intentions for the end product are often different. While the dry brine enhances flavor by adding salt, it also creates a two-way street where the delicate albumin, a water-soluble protein, is drawn to a surface that is simultaneously dried out. So in addition to the flavor benefits we see an aesthetic improvement when the fish or meat is cooked: a beautiful, crisp brown crust.
Dry brining works hand-in-hand with another technique vital to our cooking: tempering. Tempering means we remove a piece of meat or fish from refrigeration prior to cooking it (the length of time depending on the size and cut but always with an eye to maintaining standards of food safety) and allow the temperature to both rise and equalize. By reducing the difference in temperature between center and surface we ensure even cooking. When working with meat or fish, you can dry brine and temper at the same time, simultaneously applying two methods that make a better finished dish.
When it comes to brines, simple kosher salt is best. As cooks today we have access to a galaxy of different salts, but the benefits of other more expensive or exotic salts won’t really shine in these preparations. Instead we treat those salts as condiments meant to add a finishing touch of flavor or texture.
Regardless of how it is applied, salt has numerous complex interactions with the proteins in a cut of meat or fish. In addition to the flavoring aspects we have already discussed, they act to denature some of the protein structure, changing it and improving texture and increasing retention of moisture in the cells. If you’d like to understand more about the chemistry behind these interactions, you cannot do better than my friend Harold McGee’s incomparable reference “On Food and Cooking.”
But you can reap the benefits of using brines in your kitchen at home without understanding the science behind them. You only need to know what flavors you like and have a willingness to apply these techniques to bring those flavors out.
Meyer lemon-cured salmon fillets
Pat the salmon dry. In a small bowl, combine the kosher salt with the sugar and 5 grams lemon zest. Rub the mixture over the meat side of the salmon fillet. Vacuum seal the fillet in a bag at maximum pressure. Refrigerate the salmon for 24 hours. (If a vacuum sealer is not available, wrap the salmon tightly in plastic wrap and refrigerate for 24 hours, skin-side down.)
After curing the fish for 24 hours, remove the salmon from the bag (or plastic wrap), gently rinse and dry very well. Be sure to “squeegee” as much moisture from the skin as possible using a flat-sided tool, such as the back of a knife or a metal spatula, lightly rubbing it repeatedly over the skin-side of the fish and wiping it dry.
Cut the fillet into 4 equal portions. Place the salmon, skin side up, on a plate and set aside at room temperature for the fish to temper before sauteing.
Heat a large saute pan over high heat. Add the canola oil so it reaches a depth of about one-sixteenth of an inch in the pan.
When the oil is hot, place the salmon fillets, skin side down, into the oil. Cook until the skin begins to crisp, about 30 seconds, then reduce the heat to medium-low and continue to cook until about one-third of each fillet is cooked through.
Flip the fish so it is flesh side down in the pan, add the butter and reduce the heat to low. Continue to cook until another third of each fillet is cooked through. Remove from heat.
Remove the salmon from the pan and set aside to rest, skin side up. Keep the fish warm until ready to plate, then garnish with the Maldon salt and remaining lemon zest.
Final assembly
Toast the hazelnuts: Heat the oven to 350 degrees. Place the hazelnuts on a rimmed baking sheet and bake until golden brown and fragrant, about 10 minutes. Remove from the oven and cool. Coarsely crack the hazelnuts with a mallet or the bottom of a small skillet and dress with a drizzle of hazelnut oil and kosher salt. Set aside in a warm place.
Place a salmon fillet in the center of each plate. Drizzle a little of the lemon hazelnut vinaigrette around it. Off to the side, arrange a few asparagus spears and lean the beets against the fish. Add a fourth of the roasted hazelnuts to each and some of the watercress mousseline. Serve immediately.
Get our Cooking newsletter.
Your roundup of inspiring recipes and kitchen tricks.
You may occasionally receive promotional content from the Los Angeles Times.

